The Intel Edison is a physically tiny computer that draws a small amount of power and breaks out plenty of connections to allow it to interact with other electronics. It begs to be the brain of your next electronics tinkering project, with all the basics in a tiny package and an easy way to connect other things you might need.
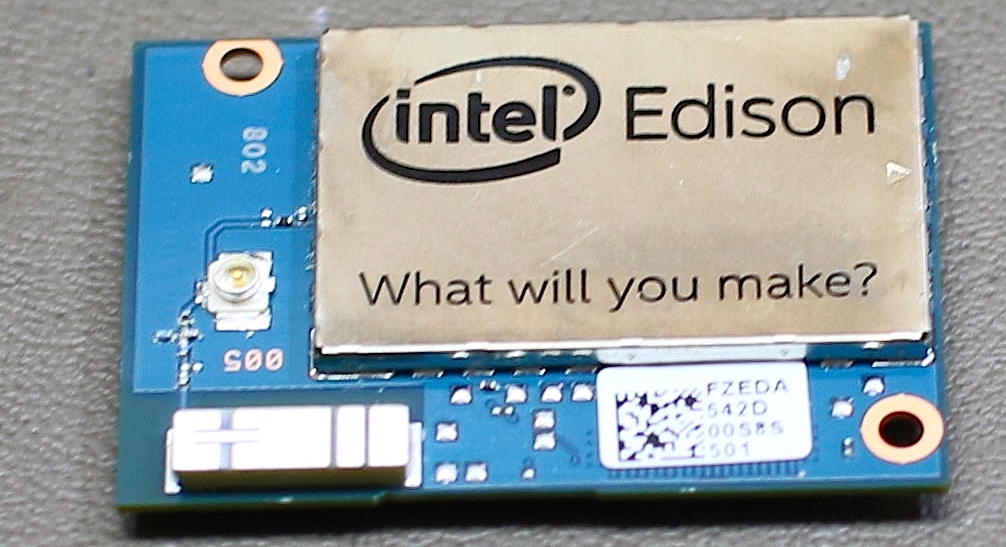
The Intel Edison measures about 1×1.5 inches but packs a dual core Atom CPU, 1GB of RAM, 4GB of storage, dual band WiFi-n, and Bluetooth (Figure 1). On the bottom of the machine is a small rectangular connector that breaks out GPIO pins, TWI, SPI, and other goodies and allows the Edison to get its power from somewhere. The Edison costs about $50, plus whatever base board you plan to power the Edison from.

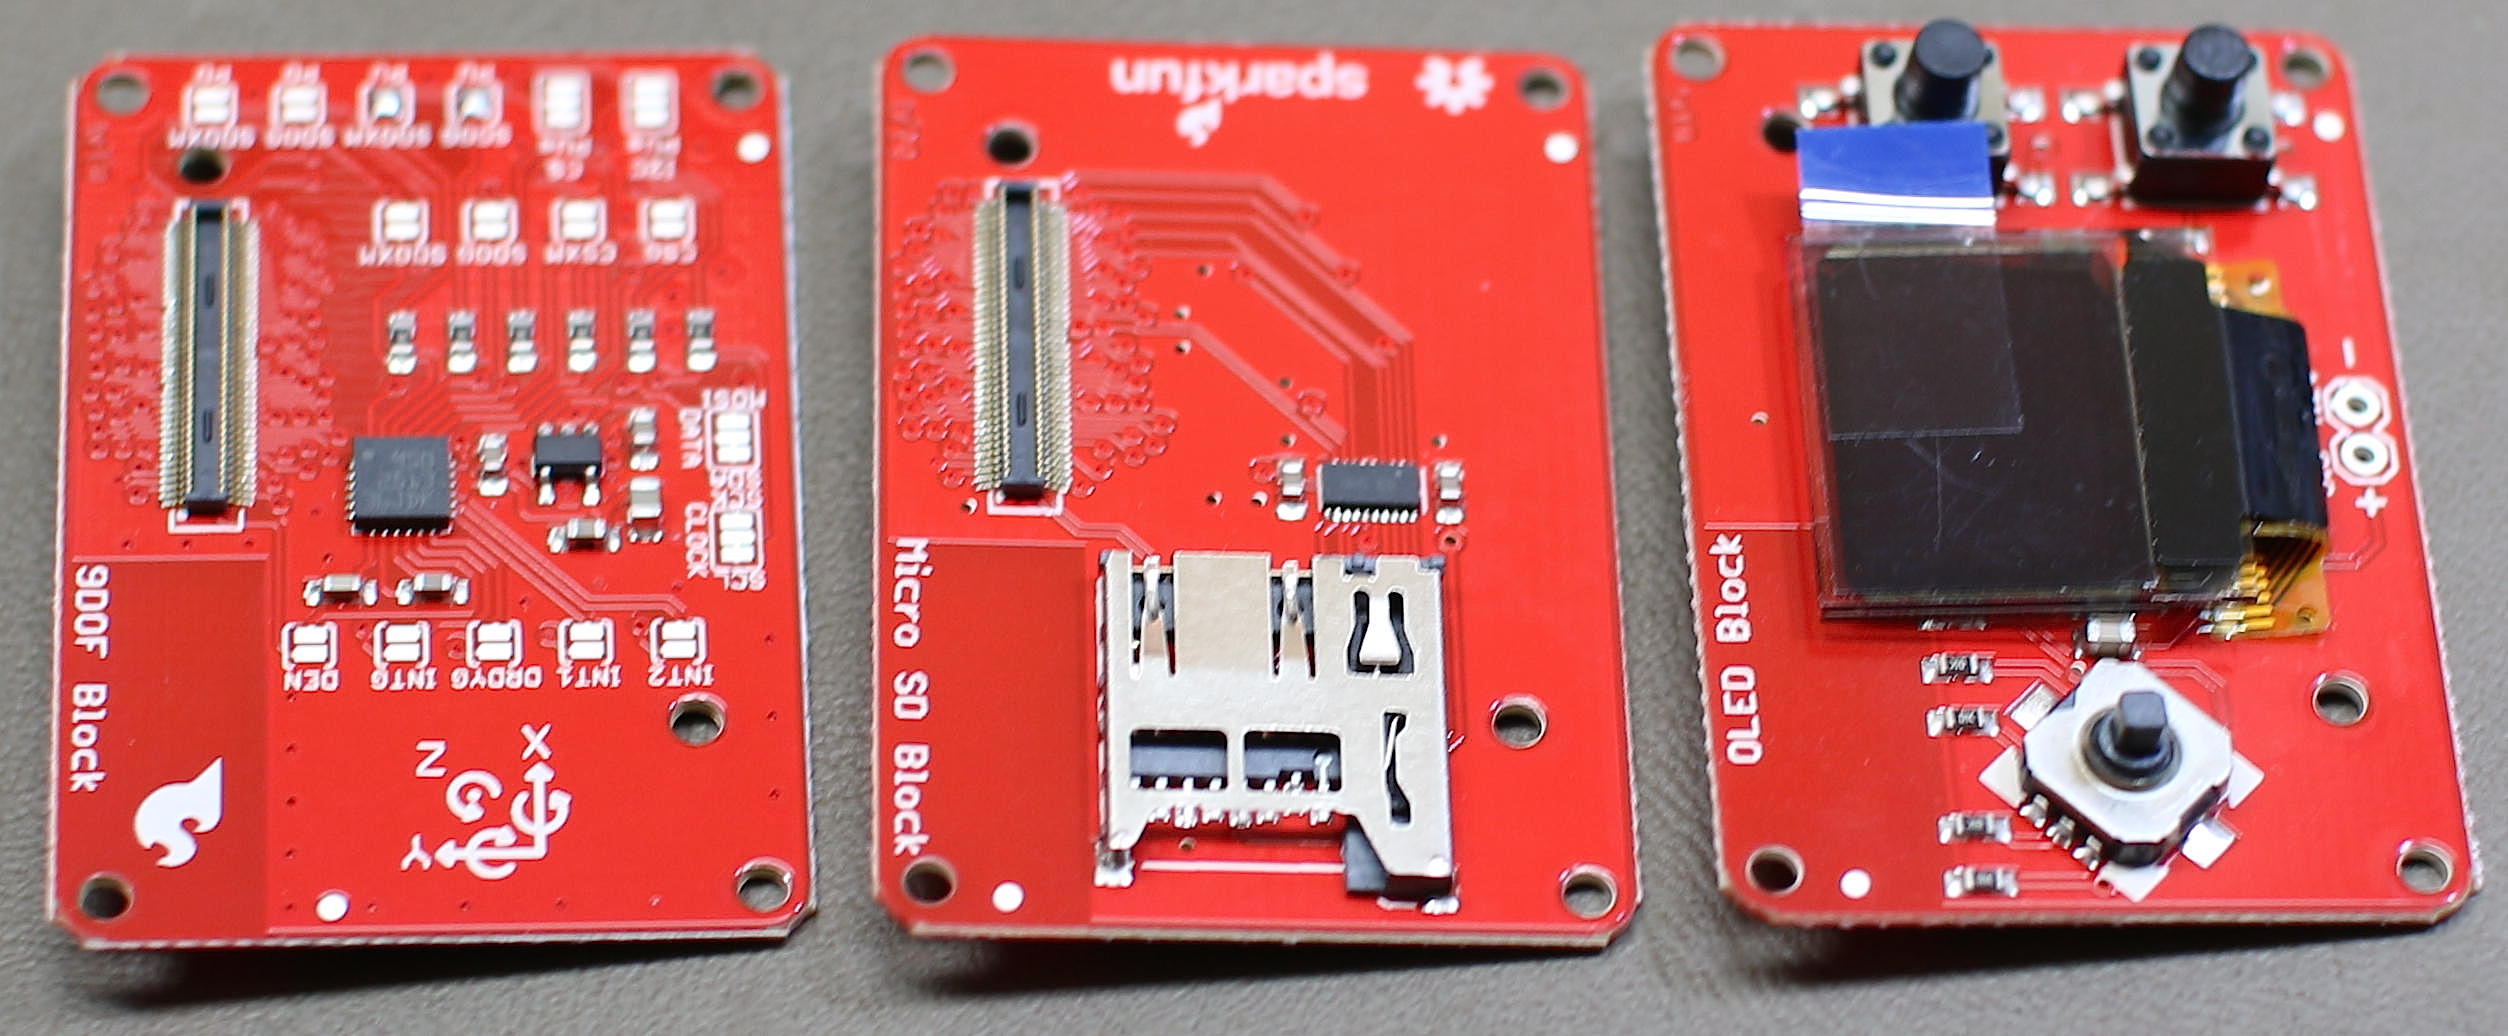
Although the little header on the bottom of the Edison helps keep things tiny, it is not the easiest thing to deal with when prototyping. SparkFun Electronics has created a collection of small break out boards for the Edison, called “Blocks” (Figure 2). Each block provides a specific feature such as an accelerometer, battery, or screen. Most blocks have an input header on one side and an output header on the other side so you can quickly stack blocks together to build a working creation. One example block that has no output is the OLED screen, because if you stacked another block above the screen you wouldn’t be able to see it anymore.

Unlike platforms such as Arduino which operate their GPIO and other pins at 5 or 3.3 volts, the Edison runs them at 1.8v. So you might need to do some voltage level shifting if you need to talk to higher voltage components from the Edison. Note that there is no HDMI or composite video on the Edison. It is fairly straightforward to connect a small screen and drive it from the Edison using SPI if you need that sort of thing.
Getting Started
The Edison does not come with an easy way to directly power it up. You have to connect the Edison using its small header to something that can offer it power. In this series, I will be using the SparkFun base block to power the Edison.
The console is a great place to start to see if the Edison is up and running. Connect the micro USB labeled console on the Base Block breakout to your desktop Linux machine and check dmesg to see something like the below to discover where the console is. The Base Block has power, TX, and RX LEDs on board so you can get some feedback from the hardware if things are working. If things go as they should, you will be presented with a root console to the Edison. There is no default password, you should just get right onto the console.
$ dmesg|tail
...
FTDI USB Serial Device converter now attached to ttyUSB0
$ screen /dev/ttyUSB0 115200
Poky (Yocto Project Reference Distro) 1.7.2 edison ttyMFD2

edison login: root
root@edison:~# df -h
/dev/root                 1.4G    446.4M    913.5M  33% /
...
/dev/mmcblk0p10           1.3G      2.0M      1.3G   0% /home

root@edison:~# cat /etc/release
EDISON-3.0
Copyright Intel 2015
The 4GB of on chip storage is broken up to allow a generous file system in the home directory and a good amount of space for the Edison itself to use for the Yocto Linux installation and applications in /usr. You can also switch over to running Debian on the Edison fairly easily.
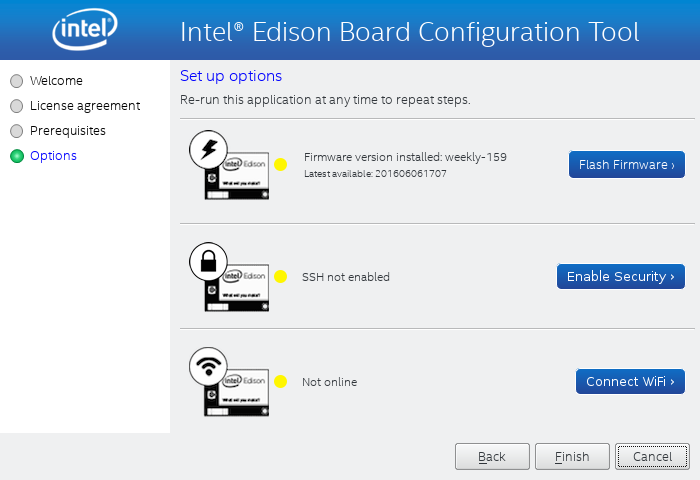
It is always a good idea to make sure you are running the newest version of the firmware for a product. There are many ways to update the Yocto Linux image on the Edison, but the Intel Edison Setup wizard is a good starting point (Figure 3).

The Intel Edison Setup wizard can be used for many useful things such as updating the Linux distribution on the Edison, setting the root password, and connecting the Edison to WiFi.
$ tar xzvf Intel_Edison_Setup_Lin_2016.2.002.tar.gz
$ cd Intel_Edison_Setup_Lin_2016.2.002
$ ./install_GUI.sh
...
$ su -l
# ./install_GUI.sh
The wizard lists supported operating systems as the 64-bit versions of Ubuntu 12.04, 13.04, 14.04, and 15.04. I was using 64-bit Fedora Linux and decided to proceed anyway.
Moving ahead, I found the Edison not detected. So I connected the USB OTG port and nothing changed. Clicking back and next in the GUI showed the versions of the Edison that was connected. So, it seems that the wizard doesn’t poll for a connected Edison, you have to force it to retry. The firmware update download is in the range of 300MB in size. I attempted to update the firmware as a non-root user, which did not work. Running the Intel Edison Setup as root allowed the Yocto image to update. So there must have been some permission issue trying to do the firmware update as a regular user.
After updating the firmware click “Enable Security” to set a hostname for the Edison and set the root password. The last option will let you set up the Edison to connect to your WiFi. Connecting to WiFi is very simple, the Edison will scan for networks and you’ll need to enter your WiFi password to complete the setup. At this stage, you will either have to check your DHCP server records or use the console on the Edison to find out the IP address it was given. Once you know that, you can ssh into the Edison over WiFi.
The Yocto Linux image for Edison was using opkg for package management. This will come in handy as the default image is quite cut down, and you will likely find yourself wanting to install an additional sprinkling of your favourite GNU/Linux software.
root@edison:~# opkg update
root@edison:~# opkg install bonnie++
Installing bonnie++ (1.03e-r0) on root.
Downloading http://iotdk.intel.com/repos/3.5/iotdk/edison/core2-32/bonnie++_1.03e-r0_core2-32.ipk.
Configuring bonnie++.
Performance
One thing that can make or break the experience of Linux on a small machine is the storage speed. Many Raspberry Pi machines limp along on a budget SD card until the card finally gives up. The Edison comes with 4GB of onboard storage and I used Bonnie++ to get an idea of how quickly you can interact with that storage.
The Linux kernel will use RAM to try to cache data so that processes run faster. To test the storage rather than the RAM cache, Bonnie++ tries to use files that are twice the size of your RAM. Unfortunately, the /home partition is only 1.3GB and the Edison has 1GB of RAM, so I couldn’t use filesystem storage twice the RAM size. This means the sequential input performance results shown below are likely incorrect as they would be coming from a RAM cache instead of off flash storage. The block level write performance at almost 19mb/s is quite impressive.
edison:~$ /usr/sbin/bonnie++ -r 256m -n 0 -d .
Writing with putc()...done
Writing intelligently...done
Rewriting...done
Reading with getc()...done
Reading intelligently...done
start 'em...done...done...done...
Version 1.03e       ------Sequential Output------ --Sequential Input- --Random-
                   -Per Chr- --Block-- -Rewrite- -Per Chr- --Block-- --Seeks--
Machine        Size K/sec %CP K/sec %CP K/sec %CP K/sec %CP K/sec %CP  /sec %CP
edison         512M  7190  92 18602  25 13470   9  9117  99 928874  99 +++++ +++
edison,512M,7190,92,18602,25,13470,9,9117,99,928874,99,+++++,+++,,,,,,,,,,,,,
As shown below, it takes around 5 seconds to create 1000 files in the home directory on the embedded flash storage.
edison:~$ cat ./test.sh
#!/bin/bash

mkdir d
cd ./d/
for i in `seq 1 1000`;
do
       touch file$i
done
sync

edison:~$ time ./test.sh

real    0m4.928s
user    0m0.230s
sys     0m0.660s
I tried to use the OpenSSL 1.0.1e compile and run that I have used on other machines in the past to test CPU performance. Although this is a very old version of OpenSSL, it is the same version that I have used on many other boards allowing some direct comparison of the hardware performance. Compiling OpenSSL took almost 20 minutes and, unfortunately, did not link a working output executable.
I downloaded the latest sysbench to test the relative performance of the Edison. Testing was done at commit f46298eb66c05c753c152a24072def935104d806. As I was not really interested in database performance I disabled it using the –without-mysql configure option. It is interesting that the Edison is around twice the speed of a Raspberry Pi 2 on CPU tests but is slower in RAM testing.
|
Machine |
CPU |
Memory |
|
Intel Core i5 (M 430 @ 2.27GHz) |
7,337 |
31,612,673 |
|
Edison |
520 |
1,179,654 |
|
Raspberry Pi 2 |
272 |
2,518,525 |
 $ ./configure  --without-mysql  && make
 $ ./src/sysbench cpu run
 $ ./src/sysbench memory run
For a raw test of CPU performance I expanded the Linux kernel file linux-4.9.10.tar.xz on all machines. The Core I5 M430 desktop machine took around 17 seconds, the Edison took 83 seconds, and the Raspberry Pi took 53 seconds. Going the other way and recompressing the Linux kernel tarball using gzip, the Core i5 took around 41 seconds, the Edison needed 3 minutes, and 27 seconds, and the Raspberry Pi 2 took 2 minutes and 52 seconds. Perhaps the compression tests are bound by both memory and CPU so the Edison and Raspberry Pi 2 are closer overall.
Power
Given the small physical size of the Edison, it will fit right into mobile applications running off battery power. I connected only the SparkFun Base Block and provided power via USB to the console port on the base block. Using a USB power meter the Edison used 0.12A with rare peaks to 0.16A during boot. Once booted, things settled at around 0.06A at idle. Both of these readings were at 5.16 volts. So, at idle the Edison used a little over 0.3 watts of power, including the rather bright blue power LED on the base board. Note that the idle reading was taken with Edison connected to WiFi.
Running sysbench cpu with two threads increased power usage up to 0.1 amps, so somewhere over half a watt.
A conservative estimate for a single AAA battery is 0.8 amp hours. Using four AAA to get into the voltage range, you might expect the Edison to run for a few hours at idle or closer to one hour if you are loading the CPU. Using LiPo batteries should give you a smaller lighter footprint with decent runtime on the Edison.
Wrap up, next time around
Although the Raspberry Pi 2 and 3 machines are fairly small, the Edison takes things to a new level with a footprint about 1/6 the size of a Pi. Having onboard storage on the Edison is great, and with WiFi and Bluetooth on board you should have connectivity under control. The stackable blocks take away the fiddly wiring and you can build quite a bit of functionality into the size of a matchbox.
Next time, we will start to dig into what we can do with some of the other SparkFun Blocks and how to use them from Yocto Linux on the Edison.
Learn more about Linux through the free “Introduction to Linux” course from The Linux Foundation and edX.


