Most modern Linux distributions enjoy standard repositories that include most of the software you’ll need to successfully run your Linux server or desktop. Should a package come up missing, more than likely you’ll find a repository you can add, so that the installation can be managed with the built-in package manager. This should be considered a best practice. Why? Because it’s important for the integrity of the platform to ensure the package manager is aware of installed software. When that is the case, packages can easily be updated (to fix vulnerabilities and the like). Another reason to install from repositories is that dependencies are easily met. When installing from source, you can sometimes find yourself trapped in a convoluted dependency nightmare.
Fortunately, repositories have become so inclusive, that it is rare you will ever need to install a package by any other means. However, you may find, on occasion, a reason to install from source. Reasons could include:
-
A package that is not found in any repository
-
A package developed in-house
-
You need to install a package with custom dependencies or options
When you do have to install from source, there are certain things you will need to know. Let’s walk through the process of installing Audacity from source on Ubuntu 16.10 (with the help of build-dep). Although this can be easily installed from repositories, it serves as a fine illustration for installing from source.
First things first
Installing from source used to be very common and also quite simple. You would download the source file, unpack it (with either zip or tar), change into the newly created directory, and then issue the commands:
./configure

make

make install
That still works for applications built with autoconf/automake. As long as your distribution met the necessary dependencies (which were almost always outlined in a README file within the source), the package would install and could be used. Although some source installations are still that simple, things are now a bit more complicated.
Another glitch in the modern system is that Ubuntu doesn’t ship with all the necessary tools to build from source. To solve that issue, you must first install autoconf with the command:
sudo apt-get install autoconf
Depending upon which version of Ubuntu you installed, you may even have to install the build-essential and build-dep packages (which includes the gcc/g++ compilers and libraries as well as a few other necessary utilities). These two packages can be installed with the command:
sudo apt-get install build-essential build-dep
For the likes of Fedora, a similar installation would be:
sudo yum install yum-utils
The above command would install the yum-builddep package.
Installing from source with build-dep
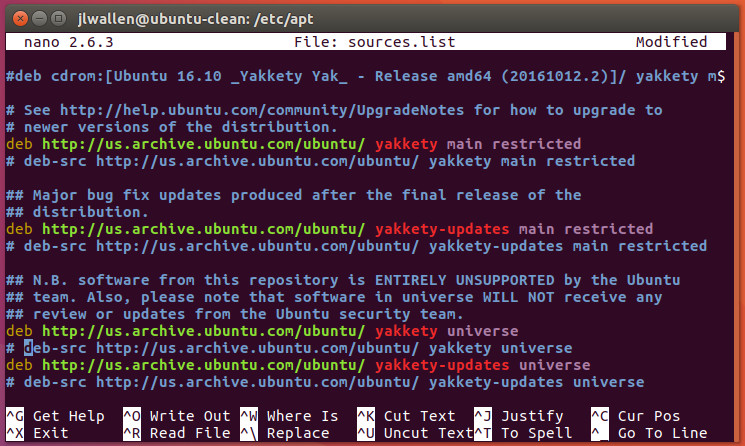
One way to install from source, but avoid the dependency nightmare, is to first work with the build-dep tool. Say you want to install audacity using build-dep; the first thing you must do is uncomment the deb-src listings in /etc/apt/sources.list. Open that file in your favorite editor and then uncomment out the two deb-src listings, by removing the leading # characters (Figure 1).

Save and close that file. Now run sudo apt-get update to update apt. Once that is done, you’re ready to build Audacity from source. Here’s what you must do. The first step is to use apt to install the necessary dependencies for Audacity. This is taken care of with the command:
sudo apt-get build-dep audacity
Allow that command to finish. The next step is to download the source package with the command:
sudo apt-get source audacity
In your current working directory, you should see a new directory called audacity-XXX (where XXX is the release number). Change into that directory. At this point, you can now issue the old tried and true:
./configure

make

sudo make install
Audacity should now be installed and ready to use.
If the installation fails, you might have to revert to using the dpkg tool like so:
sudo dpkg-buildpackage -b -uc -us
The options above are as follows:
-
b – build binary
-
uc – do not sign the .changes file
-
us – do not sign the source package
Why might a source package fail to install? Beyond not having all of the necessary dependencies, the answer very well might lie in the ./configure command.
The magic of configure
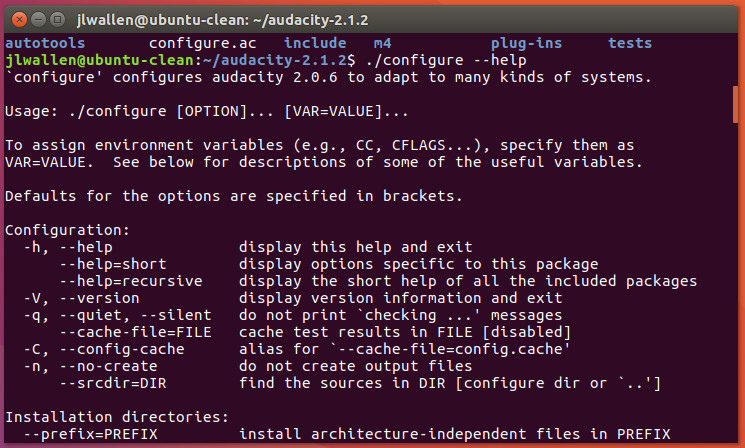
That configure command does have some magic hidden within. Most often you can run the ./configure command without any arguments. However, there are times you might want (or be required) to issue the command such that it configures the software to meet certain needs. Fortunately, the make tool can help us here. If you issue the command ./configure –help (from within the application source directory you’ve downloaded), you will be presented with a list of configuration options that can be used (Figure 2), specific to that package.

These options can sometimes mean the difference between an application installing or not. Every application you attempt to install will display different options for the ./configure command, so make sure to issue ./configure –help before issuing ./config. Possible configuration options include:
-
–prefix=PREFIX (install architecture-independent files in a non-standard location such as –prefix=/opt)
-
–build=BUILD (configure for a specific system architecture)
-
–host=HOST (the architecture of the system you want the file to run on, so you can compile the application on one machine and run it on another)
-
–disable-FEATURE (this allows you to disable specific features of an application)
-
–enable-FEATURE (this allows you to enable specific features of an application)
-
–with-PACKAGE=yes (use a specific PACKAGE)
-
–without-PACKAGE (do not use a specific PACKAGE)
As I mentioned, every software to be installed will offer different configuration options. Once you’ve decided on your options, you would then run the ./configure command (with all options). Once the configure script completes, follow it up with make and then make install to complete the installation.
Using Git
Let’s walk through another example, this time with the help of Git. As Ubuntu doesn’t ship with Git installed, we’ll first have to install it with the command:
sudo apt-get install git
Once this is installed, let’s pull down the source for the Clementine audio player with the command:
git clone https://github.com/clementine-player/Clementine.git
With the source downloaded, change into the newly added directory with the command cd Clementine. At this point, run the following commands to build the player from source:
cd bin

cmake ..

make -j8

sudo make install
That’s it. You should now have a working install of Clementine (so long as you’ve met the necessary dependencies). If the installation complains about dependencies, you can scan back through the output to find out what all needs to be installed. In the case of Clementine, you could always pick up the dependencies with the command:
sudo apt-get build-dep clementine
And there you go
That, my friends, is your introduction to installing from source. You might now not only have a better understanding as to how such an installation is handled, but why so many opt to bypass installing from source, and go straight to their distribution’s package manager. Dependency nightmares and a lack of consistency in steps helps to make the likes of apt, dpkg, yum, zypper, and dnf all the more appealing.
Yes, installing from source offers far more flexibility, but that flexibility comes at the price of simplicity.
Learn more about Linux through the free “Introduction to Linux” course from The Linux Foundation and edX.


