I’ve long been impressed by shell one-liners. They seem like magical incantations. Pipe a few terse commands together, et voilà! Out pops the solution to a problem that would seem to require pages of code.
Are these one-liners real or mythology? To some extent, they’re both. Below I’ll give a famous real example. Then I’ll argue that even though such examples do occur, they may create unrealistic expectations.
Bentley’s exercise
In 1986, Jon Bentley posted the following exercise:
Given a text file and an integer k, print the k most common words in the file (and the number of their occurrences) in decreasing frequency.
Donald Knuth wrote an elegant program in response. Knuth’s program runs for 17 pages in his book Literate Programming.
See how Git-crypt, BlackBox, SOPS, and Transcrypt stack up for storing secrets in Git.
There are a lot of great open source tools out there for storing secrets in Git. It can be hard to determine the right one for you and your organization—it depends on your use cases and requirements. To help you compare and choose, we’ll look at four of the most popular open source tools for secrets management and see how they stack up against each other:
We won’t review larger solutions like HashiCorp Vault. A production-ready Vault can be a rather large hurdle, especially if your organization is just getting started with secrets management. The tools above are easy to use and set up quickly.
Encryption types
These secrets management tools use GNU Privacy Guard (GPG), symmetric key encryption, and/or cloud key services.
Up until now, we’ve discussed the basics of what a C program is, how to compile and execute it, and what are preprocessors. If you have gone through these tutorials, it’s time we discuss the next topic, which is variables.
Variables are one of the core elements of C programming as they store values for programmers to use as per their requirement. Let’s understand their basics through an example. Following is a basic C program:
#include <stdio.h>

int main (void)
{
 int a = 10;
 char b = 'z';
 float c = 1.5;
 printf("n a=%d, b=%c, c=%f n", a,b,c);
 return 0;
}
In previous C programming tutorials, we have already explained things like what is ‘stdio.h,’ what does ‘#include’ mean, and what is a function (especially ‘main’). So, we’ll directly jump onto the variables part.
Linux isn’t just for developers. I know that might come as a surprise for you, but the types of users that work with the open source platform are as varied as the available distributions. Take yours truly for example. Although I once studied programming, I am not a developer.
The creating I do with Linux is with words, sounds, and visuals. I write books, I record audio, and a create digital images and video. And even though I don’t choose to work with distributions geared toward those specific tasks, they do exist. I also listen to a lot of music. I tend to listen to most of my music via vinyl. But sometimes I want to listen to music not available in my format of choice. That’s when I turn to digital music.
Having a Linux distribution geared specifically toward playing music might not be on the radar of the average user, but to an audiophile, it could be a real deal maker.
This bring us to Audiophile Linux. Audiophile Linux is an Arch Linux-based distribution geared toward, as the name suggests, audiophiles. What makes Audiophile Linux special? First and foremost, it’s optimized for high quality audio reproduction. To make this possible, Audiophile Linux features:
System and memory optimized for quality audio
Custom Real-Time kernel
Latency under 5ms
Direct Stream Digital support
Lightweight window manager (Fluxbox)
Pre installed audio and video programs
Lightweight OS, free of unnecessary daemons and services
Although Audiophile Linux claims the distribution is easily installed, it’s very much based on Arch Linux, so the installation is nowhere near as easy as, say, Ubuntu. At this point, you might be thinking, “But there’s already Ubuntu Studio, which is as easy to install as Ubuntu, and contains some of the same features!” That may be true, but there are users out there (even those of a more artistic bent) who prefer a decidedly un-Ubuntu distribution. On top of which, Ubuntu Studio would be serious overkill for anyone just looking for high-quality music reproduction. For that, there’s Audiophile Linux. Let’s install it and see what’s what.
Installation
As I mentioned, Audiophile is based on Arch Linux. Unlike some distributions based on Arch, however, Audiophile Linux doesn’t include a pretty, user-friendly GUI installer. Instead, what you must do is download the ISO image, burn the ISO to either a USB or CD/DVD, and boot from the device. Once booted, you’ll find yourself at a command prompt. Once at that prompt, here are the steps to install.
Create the necessary partition by issuing the command:
fdisk /dev/sdX
where X is the drive letter (discovered with the command fdisk -l).
Type n to create a new partition and then type p to make the partition a primary. When that completes, type w to write the changes. Format the new partition with the command:
mkfs.ext4 /dev/sda1
Mount the new partition with the command:
mount /dev/sda1 /mnt
Finish up the partition with the following commands;
time cp -ax / /mntarch-chroot /mnt /bin/bashcd /etc/apl-files
Install the base packages (and create a username/password with the command:
./runme.sh
Take care of the GRUB boot loader with the following commands:
Set the hardware clock and autologin with the following commands:
hwclock --systohc --utc./autologin.sh
Reboot the system with the command:
reboot
It Gets a Bit Dicey Now
There’s a problem to be found, which is related to the pacman update process. If you immediately go to update the system with the pacman -Suy command, you’ll find Xorg broken and seemingly no way to repair it. This problem has been around for some time now and has yet to be fixed. How do you get around it? First, you need to remove the libxfont package with the command:
sudo pacman -Rc libxfont
That’s not all. There’s another package that must be removed (Cantata – the Audiophile music player). Issue the command:
sudo pacman -Rc ffmpeg2.8
Now, you can update Audiophile Linux with the command:
sudo pacman -Suy
Once updated, you can finish up the installation with the command:
When this completes, reboot and log into your desktop.
The Desktop
As mentioned earlier, Audiophile Linux opts for lightweight desktop environment, Fluxbox. Although I understand why the developers would want to make use of this desktop (because it’s incredibly lightweight), many users might not enjoy working with such a minimal desktop. And since most audiophiles are going to be working with hardware that can tolerate a more feature-rich desktop. If you want to opt to go that route, you can install a desktop like GNOME with the command:
sudo pacman -S gnome
However, if you want to be a purist (and get the absolute most out of this hardware/software combination), stick with the default Fluxbox. I recommend sticking with Fluxbox especially since you’ll only be using Audiophile Linux for one purpose (listening to music).
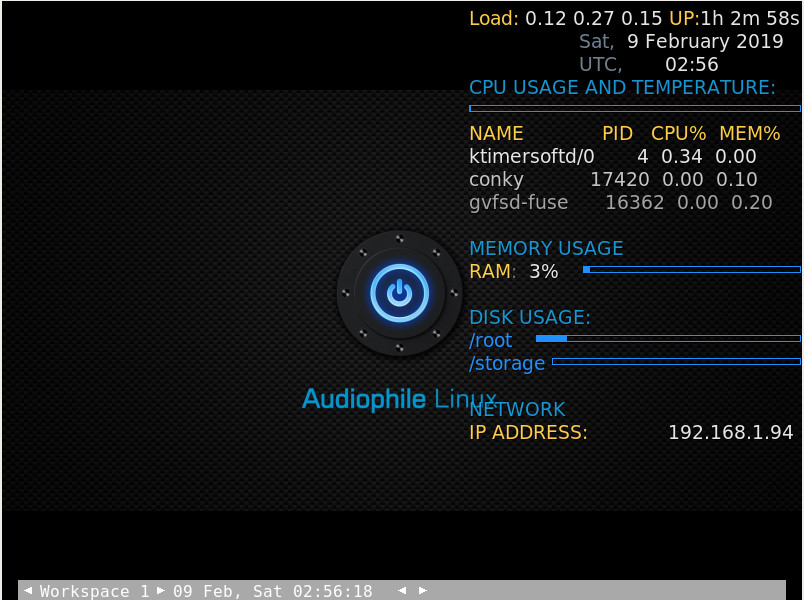
Fluxbox uses an incredibly basic interface. Right-click anywhere on the desktop and a menu will appear (Figure 1).
Figure 1: The Fluxbox desktop on Audiophile Linux.
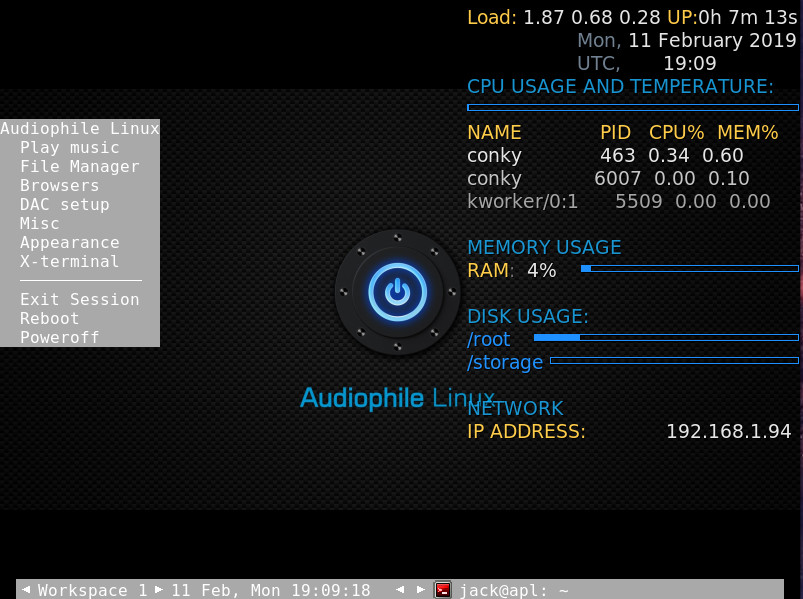
From that menu, you won’t find a lot of applications (Figure 2).
Figure 2: The Audiophile Linux Fluxbox menu.
That’s okay, because you only need one—Cantata (listed in the menu as Play music). However, after the installation, Cantata won’t run. Why? Because of a QT5 problem. To get around this, you need to issue the following commands:
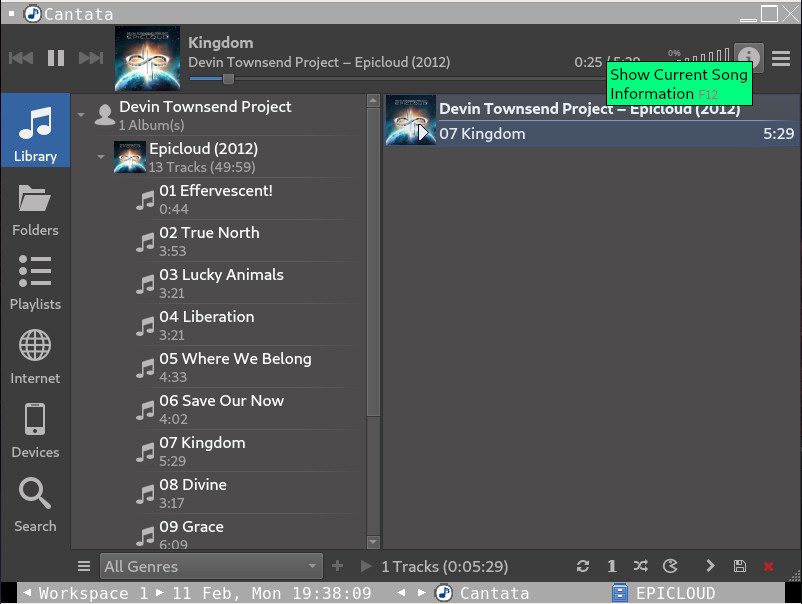
Once you’ve taken care of the above, Cantata will run and you can start playing all of the music you’ve added to the library (Figure 3).
Figure 3: Listening to Devin Townsend Project’s Kingdom.
Worth The Hassle?
I have to confess, at first I was fairly certain Audiophile Linux wouldn’t be worth the trouble of getting it up and running … for the singular purpose of listening to music. However, once those tunes started spilling from my speakers, I was sold.
Although the average listener might not notice the difference with this distribution, audiophiles will. The clarity and playback of digital music on Audiophile Linux far exceeded that on both Elementary OS and Ubuntu Linux. So if that appeals to you, I highly recommend giving Audiophile Linux a spin.
Learn more about Linux through the free “Introduction to Linux” course from The Linux Foundation and edX.
A friend recently said to me, “We can’t do DevOps, we use a SQL database.” I nearly fell off my chair. Such a statement is wrong on many levels.
“But you don’t understand our situation!” he rebuffed. “DevOps means we’ll be deploying new releases of our software more frequently! We can barely handle deployments now and we only do it a few times a year!”
I asked him about his current deployment process. …
Let me start by clearing up a number of misconceptions. Then let’s talk about some techniques for making those deployments much, much easier.
First, DevOps is not a technology, it is a methodology.
DevOps doesn’t require or forbid any particular database technology—or any technology, for that matter. Saying you can or cannot “do DevOps” because you use a particular technology is like saying you can’t apply agile to a project that uses a particular language. SQL may be a common “excuse of the month,” but it is a weak excuse.
I understand how DevOps and the lack of SQL databases could become inexorably linked in some people’s minds. In the 2000s and early 2010s companies that were inventing and popularizing DevOps were frequently big websites that were, by coincidence, also popularizing NoSQL (key/value store) databases. Linking the two, however, is confusing correlation with causation. Those same companies were also popularizing providing gourmet lunches to employees at no charge. We can all agree that is not a prerequisite for DevOps.
Mainframes are, and will continue to be, a bedrock for industries and organizations that run mission-critical applications. In one way or another, all of us are mainframe users. Every time you make an online transaction or make a reservation, for example, you are using a mainframe.
According to IBM, corporations use mainframes for applications that depend on scalability and reliability. They rely on mainframes in order to:
Perform large-scale transaction processing (thousands of transactions per second)
Support thousands of users and application programs concurrently accessing numerous resources
Manage terabytes of information in databases
Handle large-bandwidth communication
Often when people hear the word mainframe, though, they think of dinosaurs. It’s true mainframes have aged, and one challenge the mainframe community faces is that they struggle to attract fresh developers who want to use latest and shiniest technologies.
Zowe milestones
Zowe, a Linux Foundation project under the umbrella of Open Mainframe Project is changing all that. Through this project, industry heavyweights including IBM, Rocket Software, and Broadcom came together to modernize mainframes running z/OS.
Let’s start with an uncontroversial point: Software developers and system operators love Kubernetes as a way to deploy and manage applications in Linux containers. Linux containers provide the foundation for reproducible builds and deployments, but Kubernetes and its ecosystem provide essential features that make containers great for running real applications, like:
Continuous integration and deployment, so you can go from a Git commit to a passing test suite to new code running in production
Ubiquitous monitoring, which makes it easy to track the performance and other metrics about any component of a system and visualize them in meaningful ways
Declarative deployments, which allow you to rely on Kubernetes to recreate your production environment in a staging environment
Flexible service routing, which means you can scale services out or gradually roll updates out to production (and roll them back if necessary)
I’ve played with Linux on several of my own machines, but I recently unboxed my first custom-built Linux PC courtesy of Tuxedo Computers. It’s called the InfinityCube v9, and it’s left me very impressed. In fact I’ve been leaning on it more than the beefy AMD Ryzen 1950X rig I built because it’s silent and super stable. Tuxedo Computers just launched the InfinityCube on their web shop, so let’s take a quick look at this new desktop along with some initial benchmarks… Read more at Forbes
The telecom industry is at the heart of the fourth industrial revolution. Whether it’s connected IoT devices or mobile entertainment, the modern economy runs on the Internet.
However, the backbone of networking has been running on legacy technologies. Some telecom companies are centuries old, and they have a massive infrastructure that needs to be modernized.
The great news is that this industry is already at the forefront of emerging technologies. Companies such as AT&T, Verizon, China Mobile, DTK, and others have embraced open source technologies to move faster into the future. And LF Networking is at the heart of this transformation.
“2018 has been a fantastic year,” said Arpit Joshipura, General Manager of Networking at Linux Foundation, speaking at Open Source Summit in Vancouver last fall. “We have seen a 140-year-old telecom industry move from proprietary and legacy technologies to open source technologies with LF Networking.”
The Linux cat and zcat commands are more useful than you may realize.
Cat is a fairly simple tool designed to concatenate and write file(s) to your screen, which is known as standard output (stdout). It is part of the GNU Core Utils released under the GPLv3+ license. You can expect to find it in just about any Linux distribution or other Unix operating environment, such as FreeBSD or Solaris. The simplest use of cat is to show the contents of a file. Here is an example with a file named hello.world:
$ ls
hello.world
$ cat hello.world
Hello World!
$
The most common way I use the cat command is for viewing configuration files, such as those in the /etcdirectory.