When you rescue your data from a dying hard drive, time is of the essence. The longer it takes to copy your data, the more you risk losing. GNU ddrescue is the premium tool for copying dying hard drives, and any block device such as CDs, DVDs, USB sticks, Compact Flash, SD cards — anything that is recognized by your Linux system as /dev/foo. You can even copy Windows and Mac OS X storage devices because GNU ddrescue operates at the block level, rather than the filesystem level, so it doesn’t matter what filesystem is on the device.
Before you run any kind of file recovery or forensic tools on a damaged volume it is a best practice to first make a copy, and then operate on the copy.
I like to keep a SystemRescueCD handy, and also on a USB stick. (Remember the bad old days before USB devices? However did we survive?) SystemRescueCD has a small footprint and is specialized for rescue operations. These days most Linux distributions have live bootable versions so you can use whatever you are comfortable with, provided you add GNU ddrescue and any other rescue software you need.
Don’t confuse GNU ddrescue with dd-rescue by Kurt Garloff. dd-rescue is older, and the design of GNU ddrescue probably benefited from it. GNU ddrescue is fast and reliable: it skips bad blocks and copies the good blocks, and then comes back to try copying the bad blocks, tracking their location with a simple logfile.
Rescue Hardware
You need a Linux system with GNU ddrescue (gddrescue on Ubuntu), the drive you are rescuing, and a device with an empty partition at least 1.5 times as large as the partition you are rescuing, so you have plenty of headroom. If you run out of room, even if it’s just a few bytes, GNU ddrescue will fail at the very end.
There are a couple of ways to set this up. One way is to mount the sick drive on your Linux system, which is easy if it’s an optical disk or USB device. For SATA and SDD drives, USB adapters are inexpensive and easy to use. I prefer bringing the sick device to my good reliable Linux system and not hassling with bootloaders and strange hardware. I keep a spare SATA drive in a portable USB enclosure for storing the rescued data.
Another way is to boot up the system that hosts the dying drive with your SystemRescueCD (or whatever rescue distro you prefer), and connect your rescue storage drive.
If you don’t have enough USB ports, a powered USB hub is a lovely thing to have.
Identify Drive Names
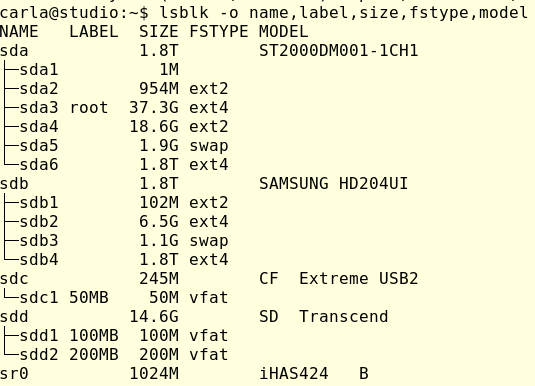
You want to make sure you have the correct device names. Connect everything and then run lsblk:

As this shows, it is possible to make mistakes. I have two 1.8TB drives. One has the root filesystem and my home directory, and the other is an extra data storage drive. lsblk accurately identifies the Compact Flash drive, an SD card, and the optical drive (sr0, iHAS424 identifies a Lite-On optical drive). If this doesn’t help you identify your drives then try findmnt:
$ findmnt -D
SOURCE     FSTYPE            SIZE   USED  AVAIL USE% TARGET
udev       devtmpfs          7.7G      0   7.7G   0% /dev
tmpfs      tmpfs             1.5G   9.6M   1.5G   1% /run
/dev/sda3  ext4             36.6G  12.2G  22.4G  33% /
tmpfs      tmpfs             7.7G   1.2M   7.7G   0% /dev/shm
tmpfs      tmpfs               5M     4K     5M   0% /run/lock
tmpfs      tmpfs             7.7G      0   7.7G   0% /sys/fs/cgroup
/dev/sda4  ext2             18.3G    46M  17.4G   0% /tmp
/dev/sda2  ext2              939M 119.1M 772.2M  13% /boot
/dev/sda6  ext4              1.8T 505.4G   1.2T  28% /home
tmpfs      tmpfs             1.5G    44K   1.5G   0% /run/user/1000
gvfsd-fuse fuse.gvfsd-fuse      0      0      0    - /run/user/1000/gvfs
/dev/sdd1  vfat             14.6G     8K  14.6G   0% /media/carla/100MB
/dev/sdc1  vfat            243.8M    40K 243.7M   0% /media/carla/50MB
/dev/sdb4  ext4              1.8T   874G 859.3G  48% /media/carla/8c670f2e-
   dae3-4594-9063-07e2b36e609e
This shows that /dev/sda3 is my root filesystem, and everything in /media is external to my root filesystem.
/media/carla/100MB2 and /media/carla/50MB have labels instead of UUIDs like /media/carla/8c670f2e-dae3-4594-9063-07e2b36e609e because I always give my USB sticks descriptive filesystem labels. You can do this for any filesystem, for example I could label the root filesystem this way:
$ sudo e2label /dev/sda3 rootdonthurtmeplz
Run sudo e2label [device] to see your nice new label. e2label is for ext2/ext3/ext4, and XFS, JFS, BtrFS, and other filesystems have different commands. The easy way is to use GParted; unmount the filesystem and then you can apply or change the label without having to look up the command for each filesystem.
Basic Rescue
Allrightythen, we’ve spent enough time figuring out how to know which drive is which. Let’s say that GNU ddrescue is on /dev/sda1, the damaged drive is /dev/sdb1, and we are copying it to /dev/sdc1. The first command copies as much as possible, without retries. The second command goes over the damaged filesystem again, and makes three retries to copy everything. The logfile is on the root filesystem, which I think is a better place than the removable media, but you can put it anywhere you want:
$ sudo ddrescue -f --no-split /dev/sdb1 /dev/sdc1 logfile
$ sudo ddrescue -f -r3 /dev/sdb1 /dev/sdc1 logfile
To copy an entire drive use just the drive name, for example /dev/sdb and don’t specify a partition.
If you have any damaged files that ddrescue could not completely recover you’ll need other tools to try to recover them, such as Testdisk, Photorec, Foremost, or Scalpel. The Arch Linux wiki has a nice overview of file recovery tools.
Learn more about Linux through the free “Introduction to Linux” course from The Linux Foundation and edX.
Editor’s Note: The article has been modified from the original version. We previously gave instructions on how to restore the damaged volume, but of course you don’t want to do that!


