 One of the many heralded aspects of Linux is its security. From the desktop to the server, you’ll find every tool you need to keep those machines locked down as tightly as possible. For the longest time, the security of Linux was in the hands of iptables (which works with the underlying netfilter system). Although incredibly powerful, iptables is complicated—especially for newer users. To truly make the most out of that system, it may take weeks or months to get up to speed. Thankfully, a much simpler front end for iptables is ready to help get your system as secure as you need.
That front end is Uncomplicated Firewall (UFW). UFW provides a much more user-friendly framework for managing netfilter and a command-line interface for working with the firewall. On top of that, if you’d rather not deal with the command line, UFW has a few GUI tools that make working with the system incredibly simple.
But, before we find out what GUI tools are available, it’s best to understand how the UFW command-line system works.
Working with the Command
The fundamental UFW command structure looks like this:
ufw [--dry-run] [options] [rule syntax]
Notice the –dry-run section. UFW includes the ability to include this argument which informs the command to not make any changes. Instead, you will see the results of your changes in the output.
As for working with the command, UFW can be used in two ways:
-
Simple syntax: Specifies a port and (optionally) the protocol
-
Full syntax: Specifies source, destination, port, and (optionally) the protocol
Let’s look at the simple syntax first. Say, for example, you want to allow traffic on port 22 (SSH). To do this with UFW, you’d run a command like:
sudo ufw allow 22
NOTE: I added sudo to the command because you must have admin privileges to run ufw. If you’re using a distribution that doesn’t take advantage of sudo, you’d first have to su to root and then run the same command (minus sudo).
Conversely, say you want to prevent traffic on port 22. To do this, the command would look like:
sudo ufw deny 22
Should you want to add a protocol to this, the command would look like:
sudo ufw deny 22/tcp
What happens if you don’t happen to know the port number for a service? The developers have taken that into consideration. UFW will run against /etc/services in such a way that you can define a rule using a service instead of a port. To allow SSH traffic, that command would look like:
sudo ufw allow ssh
Pretty simple, right? You can also add protocols to the above command, in the same way you did when defining a rule via port number.
sudo ufw allow ssh/tcp
Of the available arguments, the ones you’ll use the most with the ufw command are:
-
allow
-
deny
-
reject
-
limit
-
status: displays if the firewall is active or inactive
-
show: displays the current running rules on your firewall
-
reset: disables and resets the firewall to default
-
reload: reloads the current running firewall
-
disable: disables the firewall
If you want to use a fuller syntax, you can then begin to define a source and a destination for a rule. Say, for example, you have an IP address you’ve discovered has been attempting to get into your machine (for whatever reason) through port 25 (SMTP). Let’s say that address is 192.168.2.100 (even though it’s an internal address) and your machine address is 192.168.2.101. To block that address from gaining access (through any port), you could create the rule like so:
sudo ufw deny from 192.168.2.100/8 to 192.168.2.101 port 25
Let’s look at the limit option. If you have any reason for concern that someone might be attempting a denial of service attack on your machine, via port 80. You can limit connections to that port with UFW, like so:
sudo ufw limit 80/tcp
By default, the connection will be blocked after six attempts in a 30-second period.
You might also have a need to allow outgoing traffic on a certain port but deny incoming traffic on the same port. To do this, you would use the directional argument like so. To allow outgoing traffic on port 25 (SMTP), issue the command:
sudo ufw allow out on eth0 to any port 25 proto tcp
You could then add the next rule to block incoming traffic on the same interface and port:
sudo ufw deny in on eth0 from any 25 proto tcp
GUI Tools
Now that you understand the basics of UFW, it’s time to find out what GUI tools are available to make using this handy firewall even easier. There aren’t many which are actively maintained, and many distributions default to one in particular. That GUI is…
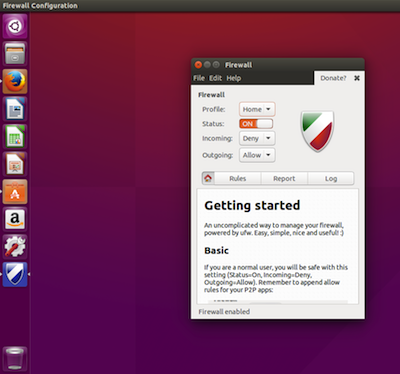
Gufw is one of the most popular GUI front ends for UFW. It’s available for Ubuntu, Linux Mint, openSUSE, Arch Linux, and Salix OS. With Gufw, you can easily create profiles to match different uses for a machine (home, public, office, etc.). As you might expect from such a tool, Gufw offers an interface that would make any level of user feel right at home (see Figure 1 above).
Some distributions, such as Ubuntu, don’t install Gufw by default. You will, however, find it in the Ubuntu Software Center. Search for gufw and install with a single click.
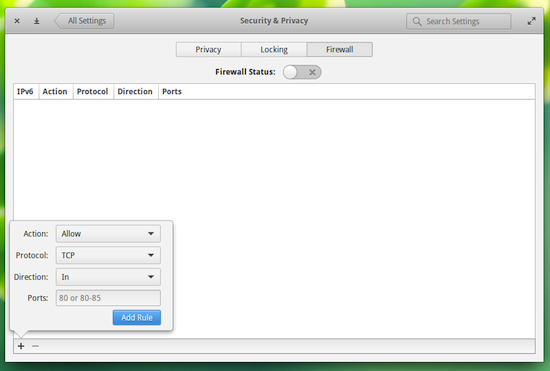
 If your distribution happens to be Elementary OS Freya, there’s a new front end for UFW built into the settings tool that allows you to very easily add rules to UFW (Figure 2). You can learn more about the Elementary OS Freya UFW front end from my post “Get to Know the Elementary OS Freya Firewall Tool.”
You might also come across another front end called ufw-frontends. That particular GUI hasn’t been in developed for some time now, so it’s best to avoid that particular app.
For most users, there is no need to spend the time learning iptables—not when there’s a much more user-friendly front end (that also happens to include solid GUI tools) that’ll get the job done. Of course, if you’re looking for business- or enterprise-class firewalling, you should certainly spend the time and effort to gain a full understanding of iptables.
Which is right for your needs, UFW or iptables?


